How to get started with the V660 terminal?
Learn about the basic instructions on using the V660 terminal device supported by Wpay.
Power-On Terminal
Your terminal will come charged and ready to use. Press and hold the power button to turn your terminal on, or if you have a V660P base, set up your base and place the terminal on it (see below). If your terminal connects via mobile data with a SIM card or via Ethernet with your V660P/ T650P base, you can start processing transactions. If not, you will need to connect via Wi-Fi (see below).
Note: To power off or restart your terminal, press and hold the power button for 1 second and then tap Power off or Restart. You will need to remove the terminal from the base to switch it off.
Power On Terminal
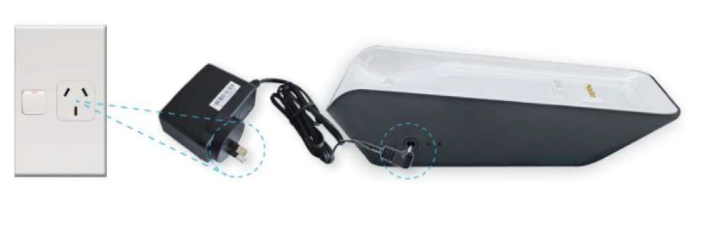
Setup your V660P base
-
Connect the power supply to the base – Plug the power valve provided into the charging port on the left side of the base and then plug the power supply into a wall socket.
-
Connect Ethernet cable to the base – Plug one end of the Ethernet cable provided into the power labelled with the below icon on your base. Plug the other end of the Ethernet cable into a free LAB port on your router.

TIP: Your terminal connects to the base via Bluetooth. If your terminal is configured correctly, once your base is connected to your router, the terminal doesn’t have to be on the base to take payment.
Please refer to the Base Pairing Guide for instructions on how to pair the base.
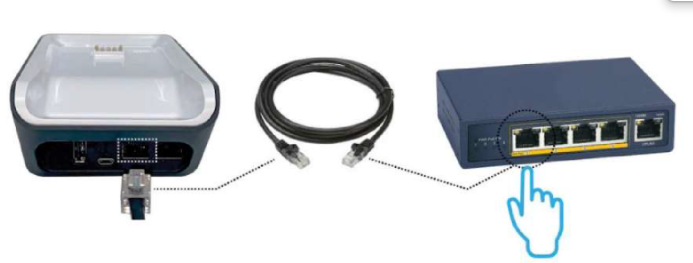
V660P base
Charge your terminal
Charge using a charging base.
When your battery has 15% remaining, you will receive an alert to charge your terminal. To save
power, receipt printing is disabled once the battery has only 5% remaining.
If the battery reaches 0% your terminal will power off. Once connected to a wall charger or charging base, the terminal may take a few minutes before it powers back on.
- Plug the power cable into the port on the side of the charging base
- Plug the power cable into a wall socket
- Place the terminal on the charging base
- Look for this icon to make sure your terminal is charging
Charge using a USB-C cable.
- Insert USB cable into the USB adapter
- Insert USB adapter into a wall socket
- Insert USB-C end of the charging cable into the USB-C charging port on the terminal
- Look for this icon in the Notification bar to make sure your terminal is charging
NOTE: You can charge your terminal by plugging the USB cable into another device, for example, a laptop or desktop computer, however charging will take significantly longer.
Navigation
Just like an Android smartphone, your terminal has a full touchscreen that responds to gestures like tapping and swiping.
- Tap – Lightly touch items to select or launch them
- Swipe – Lightly drag your finger across the screen to swipe. For example, swipe down from the
- Notification bar at the top of the screen to access the Quick Settings panel
- Touch and hold – Touch and hold items to see more information or open a pop-up menu of options
- Drag and drop – Touch and hold an item, and then move it to a new location
Notification Keys
Use the navigation keys at the bottom of the terminal for quick navigation.

Notifications
Navigation Bar
The Notification bar at the top of the screen displays status icons.
Status Icons

Navigation Bar
Notification Icons
Swipe down from the top of the screen to see notification cards for more information.

Notification Icons
Quick settings Panel
You can access the Quick Settings panel from any screen (excluding some payment screens).
Swipe down from the Notification bar for quick access to notification cards, settings, and more. To close the panel, swipe up from the bottom of the screen or tap the screen below the panel.
- Tap a quick setting icon to turn that setting on or off
- Touch and hold a quick setting icon to open the setting configuration screen
- Tap the expand icon or drag the panel down to view all quick settings
- In the expanded view, you can use the screen brightness slider at the top of the panel to adjust screen brightness
- Tap the setting icon to access the Settings menu
- Tap the Edit icon to add or remove shortcuts to the Quick Settings panel
Quick settings icons:

Quick settings icons
_NOTE: Not all available Android quick setting icons work on your EFTPOS terminal.__
Notification Cards
On the Quick Settings panel, you can swipe down the list of notification cards to see more detail about your notifications.
Change the Paper Roll
- Open the paper roll cover
- Remove the used paper roll
- Insert new roll so the paper feeds from the top, leaving a length of paper sticking out of the terminal
- Close the printer door, pressing down gently until it clicks shut
TIP: There are small slots located on each side of the paper roll cover. The easiest way to open the paper roll compartment is to put your thumbnail in one of the slots and push/flick the slot to open the cover.
Power Management
Swipe down from the Notification bar and tap the settings icon and then tap Battery to view an estimation of how long the battery has left until it needs charging and options for power management:
- Battery percentage: Toggle battery percentage display in the Notification bar on and off
- Adaptive brightness: Toggle this setting on to automatically optimize brightness level for available light.
- Sleep: Adjust the time before the terminal enters Sleep mode when idle
- Ambient display: Toggle this setting on to wake the screen when you receive new notifications.
Lock and Unlock Terminal
To save power your terminal goes into sleep mode when you’re not using it. It will also lock after a period of inactivity.
To wake your terminal
Press the power button.
To unlock your terminal
Press the power button and swipe up on the screen. ( depending on the configuration you may need to enter the unlock passcode)
NOTE: To adjust the delay before your terminal goes into sleep mode, navigate to Android Settings > Display > Sleep
Setting up Passcodes
For your security, the refund functionality on your terminal is protected by passcodes. We
recommend you set your passcodes up when you first get your terminal, so you’re ready to process a refund when you need to. You can also choose to apply passcode access to other functions, including settlement.
Changing Passcodes
- From the Payment Screen, tap the hamburger menu
- Tap Settings
- Tap Security
- Tap Passcode Management
- Select which passcode you would like to change
- Enter the current manager passcode to continue ( You will need Admin or Daily password if you are setting the passcode for the first time)
- Key in the new passcode and then re-enter the new passcode to confirm
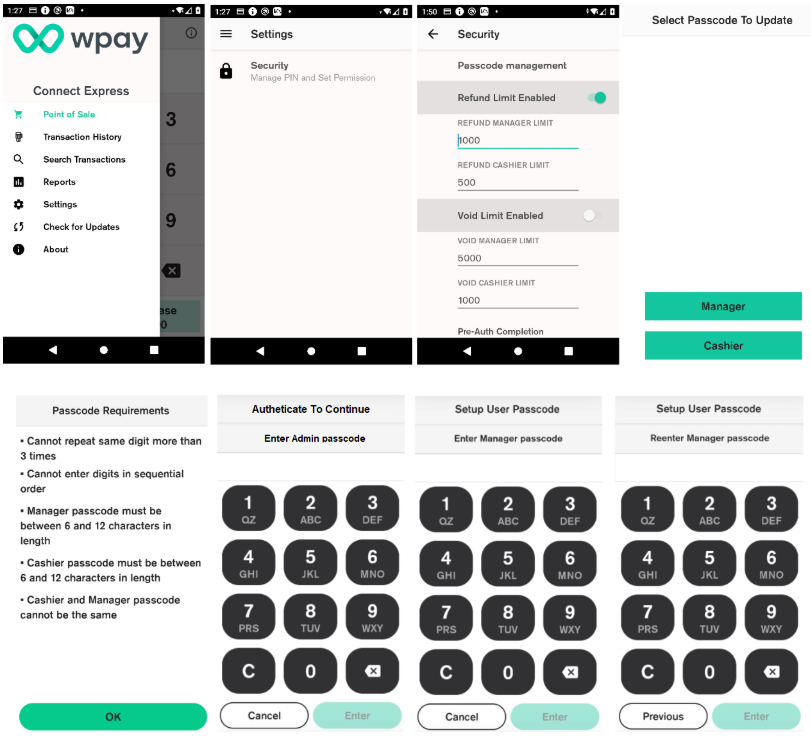
Setting up Passcodes
Updated 4 months ago